
This is a quick experiment where I tried something I’ve seen on instagram.
I took a screenshot of the movie Now You See Me – 2013 (1:53:34) and, using adobe Premiere Pro CC 2105.3, I tested my skills at colour grading. Following a few colourist and LUT instagram accounts I more than regularly see these types of images where some takes a grab from a film, reverses the colour grade and subsequently applies different looks to it.
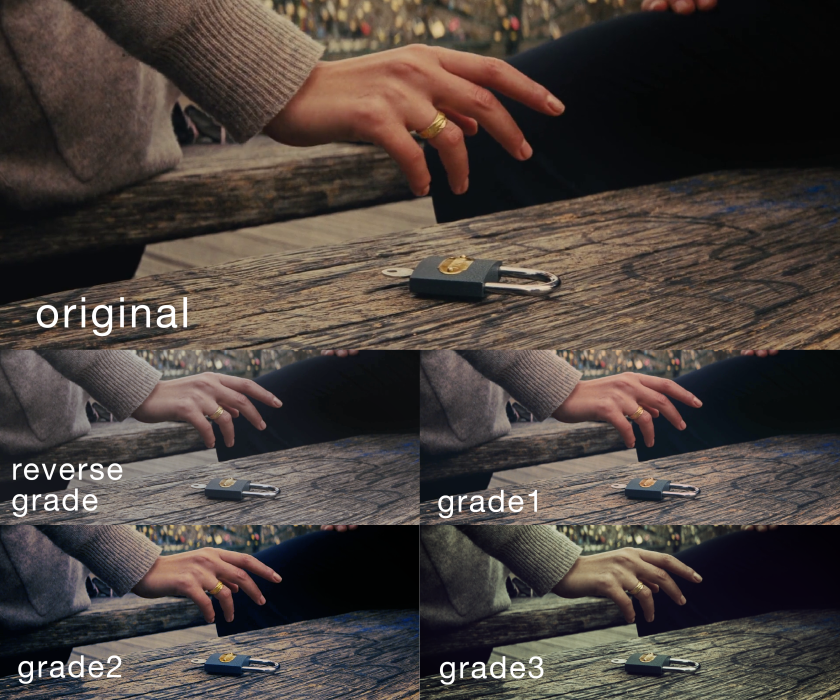
Original
- Quite warm tones
- Mostly balanced exposure
- Reds most apparent, this highlights the skin tones
- Has a bit of a faded film vibe
Reverse Grade
- I brought down the colour temperature and lowered the contrast
- Also balanced the saturation by firstly bringing all colours up and then taking the reds back a bit
Grade 1
- Using the Lumetri Color panel in Premiere Pro I tried applying some of the new included creative looks eventually settling on SL CLEAN FUJI A HDR
- I think this look, of the three, is the most similar to the movie but I think the colours look a little more natural as well as the tones being noticeably cooler
Grade 2
- I went for the ‘Michael Bay’, using the creative look SL BIG and tinting the highlights orange and the shows blue gave the kind of grade synonymous with big action films
- This look also includes a good bit of increased contrast to give lots of foot room for those tints to achieve the look
Grade 3
- For this grade I went for the look SL MATRIX MARS which throws up the contrast and tints everything green
- I also uped the faded film setting in the creative section of the Lumetri panel
- Crushing the shadows and tinting them a tiny bit blue was the final step to this grade

The reason I chose to use Premiere for this experiment is that with the addition and now expansion of the built-in Lumetri Color I’ve found an interest in colour work. Premiere is my editing software of choice and getting experienced in using Lumetri was one of my aims for this. Before I would have allied separate Lumetri adjustments to each clip (or in this case image), whereas having recently learned about adjustment layers I tried using these over the same image duplicated.
I think the looks I created turned out well and things could be taken a bit further next time with regard to the variation in looks.

nice I Like it
LikeLike
I got to learn a lot by reading your article Very good information and I’m always inspired when someone shares a new or favorite
LikeLike
Very informative article . Keep writing such nice post
LikeLike
nice I Like it
LikeLike
Nice
LikeLiked by 1 person
very good experiment thank you
LikeLike